Reactive streams: a play in multiple acts

One of the most important things to understand when working with reactive streams is that things happen in different moments. In the following, we describe this play in three different acts: assemble, subscription, and data flow

To start, let’s considerer the following code excerpt, which uses Project Reactor’s reactive streams implementation.

    @Test
    fun `a play in multiple acts`() {
        val done = CountDownLatch(2)

        log.info("Creating the mono, i.e., the processing pipeline")
        val mono: Mono<Int> = Mono.create<Int> {
                log.info("Mono.create callback called, emitting value")
                it.success(42)
            }
            .map {
                log.info("map: multiplying value by 2")
                it * 2
            }
            .delayElement(Duration.ofMillis(1000))
            .map {
                log.info("map: dividing value by 2")
                it / 2
            }

        log.info("Mono created, resting for a bit...")
        Thread.sleep(1000)
        log.info("Now going to subscribe to the mono")

        log.info("subscribing to mono on main thread")
        mono.subscribe {
            log.info("mono.subscribe called with {}", it)
            done.countDown()
        }
        log.info("subscription done")

        thread(name = "my-thread") {
            log.info("subscribing to mono on a different thread")
            mono.subscribe {
                log.info("mono.subscribe called with {}", it)
                done.countDown()
            }
            log.info("subscription done")
        }


        // waiting for subscribers to receive value before ending the test
        done.await()
    }

Act 1: assemble

The first thing this example does is create a Mono<Int> and store it in the mono value (a Mono<T> is a special kind of publisher that completes successfully by emitting a single element, or completes with an error). This is done by

  • First, creating a Mono<Int> using the create static function.
  • Using the map operator to obtain a second mono that will emit the value from the first one, multiplied by 2.
  • Using the delayElement operator to obtain a third mono that will emit the element after a 1000 millisecond delay.
  • Finally, using the map operator again to create a final mono that will emit the value divided by 2.

The assemble act uses reactive operators (e.g. map, delayElement) to build a data processing pipeline, represented in the following figure.

Note that during this phase no data is being transformed or emitted, only the pipeline is being assembled. As an example, the call to the map method does not immediately perform a data transform. Instead, it just returns a new mono that will emit the transformed value sometime in the future. In other words, nothing happens until there is a subscription to the mono (at least for cold publishers, but that is the subject of another post).

Act 2: subscription

After the processing pipeline is built, then we can pass on to the second act: the subscription. In this phase, subscribers that want access the data emitted by the mono, call the subscribe method, passing in a callback function.

In our example, we perform the subscription on the main thread and on a newly created thread. The end goal is to illustrate that:

  • The same mono can be subscribed multiple times.
  • The subscription can perfectly happen on a different thread from the one where the mono was created.

The following log output shows some interesting results.

15:29:39.616 [      main] INFO  - Creating the mono, i.e., the processing pipeline
15:29:39.692 [      main] INFO  - Mono created, resting for a bit...
15:29:40.692 [      main] INFO  - Now going to subscribe to the mono

15:29:40.693 [      main] INFO  - subscribing to mono on main thread
15:29:40.700 [      main] INFO  - Mono.create callback called, emitting value
15:29:40.701 [      main] INFO  - map: multiplying value by 2
15:29:40.703 [      main] INFO  - subscription done

15:29:40.705 [ my-thread] INFO  - subscribing to mono on a different thread
15:29:40.707 [ my-thread] INFO  - Mono.create callback called, emitting value
15:29:40.707 [ my-thread] INFO  - map: multiplying value by 2
15:29:40.707 [ my-thread] INFO  - subscription done

15:29:41.704 [parallel-1] INFO  - map: dividing value by 2
15:29:41.707 [parallel-2] INFO  - map: dividing value by 2
15:29:41.707 [parallel-1] INFO  - mono.subscribe called with 42
15:29:41.708 [parallel-2] INFO  - mono.subscribe called with 42
  • The callback function passed into the Mono.create is only called when there is a subscription. In addition, it is called once per subscription, in the same thread where the subscription is performed and before the subscribe method even returns.
  • Since the callback immediately emits a value (it.success(42)) when called, then the next processing phase in the pipeline (i.e. the one defined by the first map) is also immediately called (see map: multiplying value by 2), also before the subscribe method returns.

Act 3: data flow

As we saw in the previous log, the flow of data through the pipeline is only started when there is a subscription. Namely, both the create callback and the first processing phase happened synchronously with the subscription (i.e. at the same time and in the same thread).
However, the second map processing phase (see map: dividing value by 2) and the subscription callback are performed on a different thread, after approximately one second. That happens because between the first and the second map there is a delayElement: the value is only emitted into the second map phase one second after being produced by the first map phase.

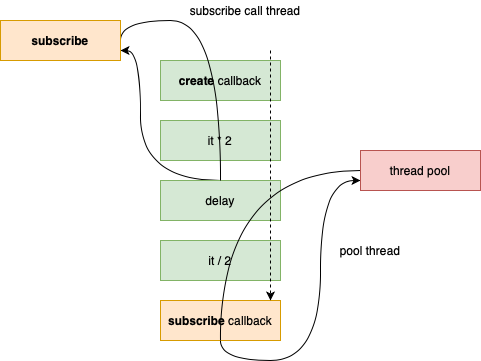
This is an example of an asynchronous processing phase. Since a fundamental characteristic of reactive streams is that there should be no blocking, the thread that performs the first map is released and the second map is performed on a thread managed by Reactor, only when the delay period elapses.

The flow of data through the pipeline starts when there is a subscription but it doesn’t end there. Namely, if there are asynchronous processing phases in the pipeline, the flow can pause (without blocking) and resume when some asynchronous event happens (e.g. a time period elapses, a message from a remote system is received). That is, the flow can be divided into multiple segments, with non-blocking pauses between them.

Summary

  • There are at least three different moments (the acts) associated with reactive streams
    • The pipeline assembly.
    • The subscription.
    • The data flow, through the pipeline.
  • Nothing happens until there is a subscription.
  • Data flow can happen partially or totally during the subscription.
  • Data flow can be divided into multiple segments, with non-blocking pauses between them (e.g. time delay, waiting for external system event).
  • On a cold publisher, there is a flow of data per each subscription. In the case of a mono, that flow will be comprised of a single element (at most).

The source code is available on the webflux-with-kotlin-by-example repository.

HTH

RFC 8252 and OAuth 2.0 for Native Apps

Introduction

RFC 8252 – OAuth 2.0 for Native Apps, published this month by IETF as a Best Current Practice, contains much needed guidance on how to use the OAuth 2.0 framework in native applications.
In this post I present a brief summary of the defined best practices.

OAuth for native applications

When the OAuth 1.0 protocol was introduced 10 years ago, its main goal was delegated authorization for client applications accessing services on behalf of users.
It was focused on the model “du jour”, where client applications were mostly server-side rendered Web sites, interacting with end users via browsers.
For instance, it was assumed that client applications were capable of holding long-term secrets, which is rather easy for servers but not for browser-side applications or native applications running on the user’s device.

OAuth 2.0, published on 2012, introduced a framework with multiple different flows, including the support for public clients, that is, clients that don’t need to hold secrets.
However it was still pretty much focused on classical Web sites and using this framework in the context of native applications was mostly left as an exercise for the reader.
Some of the questions that didn’t had a clear or straightforward answer were:

  • What is the adequate flow for a native application?
  • Should a native application be considered a confidential client or a public client?
  • Assuming an authorization code flow or intrinsic flow, how should the authorization request be performed: via an embedded web view or via the system browser?
  • How is the authorization response redirected back into the client application, since it isn’t a server any more? Via listening on a loopback port or using platform specific mechanisms (e.g. Android intents and custom URI schemes)?
  • What’s the proper way for avoiding code or token leakage into malicious applications also installed in the user’s device?

The first major guidance to these questions came with RFC 7636 – Proof Key for Code Exchange by OAuth Public Clients, published in 2015.
This document defines a way to use the authorization code flow with public clients, i.e. adequate to native applications, protected against the interception of the authorization code by another application (e.g. malicious applications installed in the same user device).
The problem that it addresses as well as the proposed solutions are described on a previous post: OAuth 2.0 and PKCE.

The recently published RFC 8252 – OAuth 2.0 for Native Apps (October 2017) builds upon RFC 7636 and defines a set of best practices for when using OAuth 2.0 on native applications, with emphasis on the user-agent integration aspects.

In summary, it defines the following best practices:

  • A native client application must be a public client, except if using dynamic client registration (RFC7591) to provision per device unique clients, where each application installation has an set of secret credentials) – section 8.4.

  • The client application should use the authorization code grant flow with PKCE (RFC 7636 – Proof Key for Code Exchange by OAuth Public Clients), instead of the implicit flow, namely because the later does not support the protection provided by PKCE – section 8.2.

  • The application should use an external user-agent, such as the system browser, instead of an embedded user-agent such as a web view – section 4.

    • An application using a web view can control everything that happens inside it, namely access the user’s credentials when they are inserted on it.
      Using an external user-agent isolates the user credentials from the client application, which is one of the OAuth 2.0 original goals.

    • Using the system-browser can also provide a kind of Single Sign-On – users delegating access to multiple applications using the same authorization server (or delegated identity provider) only have to authenticate once because the session artifacts (e.g. cookies) will still be available.

    • To avoid switching out of the application into the external user-agent, which may not provide a good user experience, some platforms support “in-app browser tabs” where the user agent seems to be embedded into the application, while supporting full data isolation – iOS SFAuthenticationSession or Android’s Chrome Custom Tabs.

  • The authorization request should use one of the chosen user-agent mechanism, by providing it with the URI for the authorization endpoint with the embedded request on it.

  • The redirect back to the application can use one of multiple techniques.

    • Use a redirect endpoint (e.g. com.example.myapp:/oauth2/redirect) with a private scheme (e.g. com.example.myapp) that points to the application.
      Android’s implicit intents are an example of a mechanism allowing this.
      When using this technique, the custom URI scheme must be the reversal of a domain name under the application’s control (e.g. com.example.myapp if the myapp.example.com name is controlled by the application’s author) – section 7.1.

    • Another option is to use a claimed HTTPS redirect URI, which is a feature provided by some platforms (e.g. Android’s App Links) where a request to a claimed URI triggers a call into the application instead of a regular HTTP request. This is considered to be the preferred method – section 7.2.

    • As a final option, the redirect can be performed by having the application listening on the loopback interface (127.0.0.1 or ::1).

To illustrate these best practices, the following diagram represents an end-to-end OAuth 2.0 flow on a native application

native.auth

  • On step 1, the application invokes the external user-agent, using a platform specific mechanism, and passing in the authorization URI with the embedded authorization request.

  • As a consequence, on step 2, the external user-agent is activated and does a HTTP request to the authorization endpoint using the provided URI.

  • The response to step 2 depends on the concrete authorization endpoint and is not defined by the OAuth specifications.
    A common pattern is for the response to be a redirect to a login page, followed by a consent page.

  • On step 3, after ending the direct user interaction, the authorization endpoint produces a HTTP response with the authorization response embedded inside (e.g. 302 status code with the authorization response URI in the Location header).

  • On step 4, the user-agent reacts to this response by processing the redirect URI.
    If using a private scheme or a claimed redirect URI, the user-agent uses a platform specific inter process communication mechanism to deliver the authorization response to the application (e.g. Android’s intents).
    If using localhost as the redirect URI host, the user-agent does a regular HTTP requests to the loopback interface, which is being listened by the application, thereby providing the authorization response to it.

  • On steps 5 and 6, the application exchanges the authorization code for the access and refresh tokens, using a straightforward token request.
    This interaction is done directly between the client and the token endpoint, without going through the user-agent, since no user interaction is needed (back-channel vs. front-channel).
    Since the client is public, this interaction is not authenticated (i.e. does not include any client application credentials).
    Due to this anonymous characteristic and to protect against code hijack, the code_verifier` parameter from the PKCE extension must be added to the token request.

  • Finally, on step 7, the application can use the resource server on the user’s behalf, by adding the access token to the Authorization header.

The AppAuth libraries for iOS and Android already follows these best practices.

I hope this brief summary helps.
As always, questions, comments, and suggestions are highly appreciated.

Accessing the HTTP Context on ASP.NET Core

TL;DR

On ASP.NET Core, the access to the request context can be done via the new IHttpContextAccessor interface, which provides a HttpContext property with this information. The IHttpContextAccessor is obtained via dependency injection or directly from the service locator. However, it requires an explicit service collection registration, mapping the IHttpContextInterface to the HttpContextAccessor concrete class, with singleton scope.

Not so short version

System.Web

On classical ASP.NET, the current HTTP context, containing both request and response information, can be accessed anywhere via the omnipresent System.Web.HttpContext.Current static property. Internally, this property uses information stored in the CallContext object representing the current call flow. This CallContext is preserved even when the same flow crosses multiple threads, so it can handle async methods.

ASP.NET Web API

On ASP.NET Web API, obtaining the current HTTP context without having to flow it explicitly on every call is typically achieved with the help of the dependency injection container.
For instance, Autofac provides the RegisterHttpRequestMessage extension method on the ContainerBuilder, which allows classes to have HttpRequestMessage constructor dependencies.
This extension method configures a delegating handler that registers the input HttpRequestMessage instance into the current lifetime scope.

ASP.NET Core

ASP.NET Core uses a different approach. The access to the current context is provided via a IHttpContextAccessor service, containing a single HttpContext property with both a getter and a setter. So, instead of directly injecting the context, the solution is based on injecting an accessor to the context.
This apparently superfluous indirection provides one benefit: the accessor can have singleton scope, meaning that it can be injected into singleton components.
Notice that injecting a per HTTP request dependency, such as the request message, directly into another component is only possible if the component has the same lifetime scope.

In the current ASP.NET Core 1.0.0 implementation, the IHttpContextAccessor service is implemented by the HttpContextAccessor concrete class and must be configured as a singleton.
 

public void ConfigureServices(IServiceCollection services)
{
    services.AddMvc();
    services.AddSingleton<IHttpContextAccessor, HttpContextAccessor>();
}

Notice that this registration is not done by default and must be explicitly performed. If not, any IHttpContextAccessor dependency will result in an activation exception.
On the other hand, no additional configuration is need to capture the context at the beginning of each request, because this is automatically done.

The following implementation details shed some light on this behavior:

  • Each time a new request starts to be handled, a common IHttpContextFactory reference is used to create the HttpContext. This common reference is obtained by the WebHost during startup and used for all requests.

  • The used HttpContextFactory concrete implementation is initialized with an optional IHttpContextAccessor implementation. When available, this accessor is assigned with each created context. This means that if any accessor is registered on the services, then it will automatically be used to set all created contexts.

  • How can the same accessor instance hold different contexts, one for each call flow? The answer lies in the HttpContextAccessor concrete implementation and its use of AsyncLocal to store the context separately for each logical call flow. It is this characteristics that allows a singleton scoped accessor to provide request scoped contexts.

To conclude:

  • Everywhere the HTTP context is needed, declare an IHttpContextAccessor dependency and use it to fetch the context.

  • Don’t forget to explicitly register the IHttpContextAccessor interface on the service collection, mapping it to the concrete HttpContextAccessor type.

  • Also, don’t forget to make this registration with singleton scope.

Should I PUT or should I POST? (Darling you gotta let me know)

(yes, it doesn’t rhyme however I couldn’t resist the association)

Selecting the proper methods (e.g. GET, POST, PUT, …) to use when designing HTTP based APIS is typically a subject of much debate, and eventually some bike-shedding. In this post I briefly present the rules that I normally follow when faced with this design task.

Don’t go against the HTTP specification

First and foremost, make sure the properties of the chosen methods aren’t violated on the scenario under analysis. The typical offender is using GET for an interaction that requests a state change on the server.
Why is this bad? Because GET is defined to have the safe property, defined as

Request methods are considered “safe” if their defined semantics are essentially read-only; i.e., the client does not request, and does not expect, any state change on the origin server as a result of applying a safe method to a target resource.

Another example is choosing PUT for requests that aren’t idempotent, such as appending an item to a collection.
The idempotent property is defined by RFC 7231 as

A request method is considered “idempotent” if the intended effect on the server of multiple identical requests with that method is the same as the effect for a single such request.

Breaking these properties is harmful because there may exist system components whose correct behavior depends on them being true. An example is a crawler program that freely follows all GET links in a document, assuming that no state change will be performed by these requests, and that ends up changing the system state.

Another example is an intermediary (e.g. reverse proxy) that automatically retries any failed PUT request (e.g. timeout), assuming they are idempotent. If the PUT is appending items to a collection (append is not idempotent), and the first PUT request was successfully performed and only the response message was lost, then the retry will end up adding two replicated items to the collection.

This violation can also have security implications. For instance, most server frameworks don’t protect GET requests agains CSRF (Cross-Site Request Forgery) attacks because the GET method is not supposed to change state and reads are already protected by the same-origin browser policy.

Take advantage of the method properties

After ensuring the correctness concerns, i.e., ensuring requests don’t violate any property of chosen methods, we can revert our analysis and check if there aren’t any methods that best fit the intended functionality. After having ensured correctness, in this stage our main concern is going to be optimisation.

For instance, if a request defines the complete state for a resource and is idempotent, perhaps a PUT is a better fit than a POST. This is not because a POST will produce incorrect behavior but because using a PUT may induce better system properties. For instance, an intermediary (e.g. reverse proxy or framework middleware) may automatically retry failed requests, and by this provide some fault recovery.

When nothing else fits, use POST

Contrary to some HTTP myths, the POST is not solely intended to create resources. In fact, the newer RFC 7231 states

The POST method requests that the target resource process the representation enclosed in the request according to the resource’s own specific semantics

The “according to the resource’s own specific semantics” effectively allows us to use POST for requests with any semantics. However the fact that it allows us doesn’t mean that we always should. Again, if another method (e.g. GET or PUT) best fits the request purpose, not choosing it may mean throwing away interesting properties, such as caching or fault recovery.

Does my API look RESTful in this method?

One thing that I always avoid is deciding based on the apparent “RESTfullness” of the method – For instance, an API doesn’t have to use PUT to be RESTful.

First and foremost we should think in terms of system properties and use HTTP accordingly. That implies:

  • Not violating its rules – E.g. what can go wrong if I choose PUT for this request?
  • Taking advantage of its benefits – E.g. what do I loose if I don’t choose PUT for this request?

I hope this helps. Feedback welcomed.
Cheers.

Health check APIs, 500 status codes and media types

A status or health check resource (or endpoint, to use the more popular terminology) is a common way for a system to provide an aggregated representation of its operational status. This status representation typically includes a list with the individual system components or health check points and their individual status (e.g. database connectivity, memory usage threshold, deadlocked threads).

For instance, the popular Dropwizard Java framework already provides an out-of-the-box health check resource, located by default on the /healthcheck URI of the administration port, for this purpose.

The following is an example of such representation, defined by a JSON object containing a field by each health check verification.

{
    "deadlocks":{
        "healthy":true
    },
    "database":{
        "healthy":true
    }
}

Apparently, it is also a common practice for a GET request to these resources to return a 500 status code if any of the internal components reports a problem. For instance, the Dropwizard documentation states

If all health checks report success, a 200 OK is returned. If any fail, a 500 Internal Server   Error is returned with the error messages and exception stack traces (if an exception was  thrown).

In my opinion, this practice goes against the HTTP status code semantics because the server  was indeed capable of processing the request and producing a valid response with a correct resource state representation, that is, a correct representation of the system status. The fact that this status includes the information of an error does not changes that.

So, why is this incorrect practice used so often? My conjecture has two reasons for it.

  • First, an incomplete knowledge of the HTTP status code semantics that may induce the following reasoning: if the response contains an error then a 500 must be used.
  •  Second, and perhaps more important, because this practice really comes in handy when using external monitoring systems (e.g. nagios) to periodically check these statuses. Since these monitoring systems do not commonly understand the healthcheck representation, namely because each API or framework uses a different one, the easier solution is to rely solely on the status code: 200 if everything is apparently working properly, 500 if something is not ok.

Does this difference between a 200 and a 500 matters, or are we just being pedantic here? Well, I do think it really matters: by returning a 500 status code on a correctly handled request, the status resource is hiding errors on its own behaviour. For instance, lets consider the common scenario where the status resource is implemented by a third-party provider. A failure of this provider will be indistinguishable of a failure on the system under checking, because a 500 will be returned in both cases.

This example shows the consequences of the lack of effort on designing and standardizing media types. The availability of a standard media type would allow a many-to-many relation between monitoring systems and health check resources.

  • A health check resource could easily be monitored/queried by any monitoring system.
  • A monitoring system could easily inspect multiple health check resources, implemented over different technologies.


monitoring

Also, by a using a media-type, the monitoring result could be much richer than “ok” vs. “not ok”.

To conclude with a call-to-action, we really need to create a media type to represent health check or status outcomes, eventually based on an already existing media type:

  • E.g. building upon the “application/problem+json” (RFC 7807), extended to represent multiple problem status (e.g example).
  • E.g. building upon the “application/status+json” media type proposal.

Comments are welcomed.


On contracts and HTTP APIs

Reading the twitter conversation started by this tweet

https://twitter.com/michaeltecourt/status/769256765624053760

made me put in written words some of the ideas that I have about HTTP APIs, contracts and “out-of-band” information.
Since it’s vacations time, I’ll be brief and incomplete.

  • On any interface, it is impossible to avoid having contracts (i.e. shared “out-of-band” information) between provider and consumer. On a HTTP API, the syntax and semantics of HTTP itself is an example of this shared information. If JSON is used as a base for the representation format, then its syntax and semantics rules are another example of shared “out-of-band” information.
  • However not all contracts are equal in the generality, flexibility and evolvability they allow. Having the contract include a fixed resource URI is very different from having the contract defining a link relation. The former prohibits any change on the URI structure (e.g. host name, HTTP vs HTTPS, embedded information), while the later one enables it. Therefore, designing the contract is a very important task when creating HTTP APIs. And since the transfer contract is already rather well defined by HTTP, most of the design emphasis should be on the representation contract, include the hypermedia components.
  • Also, not all contracts have the same cost to implement (e.g. having hardcoded URIs is probably simpler than having to find links on representations), so (as usual) trade-offs have to be taken into account.
  • When implementing HTTP APIs is also very important to have the contract-related areas clearly identified. For me, this typically involves being able to easily answering questions such as: – Will I be breaking the contract if
    • I change this property name on this model?
    • I add a new property to this model?
    • I change the routing rules (e.g. adding a new path segment)?

Hope this helps
Looking forward for feedback


Focus on the representation semantics, leave the transfer semantics to HTTP

A couple of days ago I was reading the latest OAuth 2.0 Authorization Server Metadata document version and my eye got caught on one sentence. On section 3.2, the document states

A successful response MUST use the 200 OK HTTP status code and return a JSON object using the “application/json” content type (…)

My first reaction was thinking that this specification was being redundant: of course a 200 OK HTTP status should be returned on a successful response. However, that “MUST” in the text made me think: is a 200 really the only acceptable response status code for a successful response? In my opinion, the answer is no.

For instance, if caching and ETags are being used, the client can send a conditional GET request (see Hypertext Transfer Protocol (HTTP/1.1): Conditional Requests) using the If-None-Match header, for which a 304 (Not Modified) status code is perfectly acceptable. Another example is if the metadata location changes and the server responds with a 301 (Moved Permanently) or a 302 (Found) status code.Does that means the request was unsuccessful? In my opinion, no. It just means that the request should be followed by a subsequent request to another location.

So, why does this little observation deserve a blog post?
Well, mainly because it reflects two common tendencies when designing HTTP APIs (or HTTP interfaces):

  • First, the tendency to redefine transfer semantics that are already defined by HTTP.
  • Secondly, a very simplistic view of HTTP, ignoring parts such as caching and optimistic concurrency.

The HTTP specification already defines a quite rich set of mechanisms for representation transfer, and HTTP related specifications should take advantage of that. What HTTP does not define is the semantics of the representation itself. That should be the focus of specifications such as the OAuth 2.0 Authorization Server Metadata.

When defining HTTP APIs, focus on the representation semantics. The transfer semantics is already defined by the HTTP protocol.


Client-side development on OS X using Windows hosted HTTP Web APIs

In a recent post I described my Android development environment, based on a OS X host, the Genymotion Android emulator, and a Windows VM to run the back-end HTTP APIs.
In this post I’ll describe a similar environment but now for browser-side applications, once again using Windows hosted HTTP APIs.

Recently I had to do some prototyping involving browser-based applications, using ES6 and React, that interact with IdentityServer3 and a HTTP API.
Both the IdentityServer3 server and the ASP.NET HTTP APIs are running on a Windows VM, however I prefer to use the host OS X environment for the client side development (node, npm, webpack, babel, …).
Another requirement is that the server side uses HTTPS and multiple name hosts (e.g. id.example.com, app1.example.com, app2.example.com), as described in this previous post.

The solution that I ended up using for this environment is the following:

  • On the Windows VM side I have Fiddler running on port 8888 with “Allow remote computer to connect” enabled. This means that Fiddler will act as a proxy even for requests originating from outside the Windows VM.
  • On the OS X host I launch Chrome with open -a “/Applications/Google Chrome.app” –args –proxy-server=10.211.55.3:8888 –proxy-bypass-list=localhost, where 10.221.55.3 is the Windows VM address. To automate this procedure I use the automator tool  to create a shell script based workflow.

The end result, depicted in the following diagram, is that all requests (except for localhost) will be forwarded to the Fiddler instance running on the Windows VM, which will use the Windows hosts file to direct the request to the multiple IIS sites.

hosting
As a bonus, I also have full visibility on the HTTP messages.

And that’s it. I hope it helps.

Using multiple IIS server certificates on Windows 7

Nowadays I do most of my Windows development on a Windows 7 VM running on OS X macOS (Windows 8 and Windows Server 2012 left some scars so I’m very reluctance on moving to Windows 10). On this development environment I like to mimic some production environment characteristics, namely:

  • Using IIS based hosting
  • Having each site using different host names
  • Using HTTPS

For the site names I typically use example.com subdomains (e.g. id.example.com, app1.example.com, app2.example.com), which are reserved by IANA for documentation purposes (see RFC 6761). I associate these names to local addresses via the hosts file.

For generating the server certificates I use makecert and the scripts published at Appendix G of the Designing Evolvable Web APIs with ASP.NET.

However, having multiple sites using distinct certificates hosted on the same IP and port address presents some challenges. This is because IIS/HTTP.SYS uses the Host header to demultiplex the incoming requests to the different sites bound to the same IP and port.
However, when using TLS, the server certificate must be provided on the TLS handshake, well before the TLS connection is established and the Host header is received. Since at this time HTTP.SYS does not know the target site it also cannot select the appropriate certificate.

Server Name Indication (SNI) is a TLS extension (see RFC 3546) that addresses this issue, by letting the client send the host name in the TLS handshake, allowing the server to identity the target site and use the corresponding certificate.

Unfortunately, HTTP.SYS on Windows 7 does not support SNI (that’s what I get for using 2009 operating systems). To circumvent this I took advantage of the fact that there are more loopback addresses other than 127.0.0.1. So, what I do is to use different loopback IP addresses for each site on my machine as illustrated by the following my hosts file excerpt

127.0.0.2 app1.example.com
127.0.0.3 app2.example.com
127.0.0.4 id.example.com

When I configure the HTTPS IIS bindings I explicitly configure the listening IP addresses using these different values for each site, which allows me to use different certificates.

And that’s it. Hope it helps.

The OpenID Connect Cast of Characters

Introduction

The OpenID Connect protocol provides support for both delegated authorization and federated authentication, unifying features that traditionally were provided by distinct protocols. As a consequence, the OpenID Connect protocol parties play multiple roles at the same time, which can sometimes be hard to grasp. This post aims to clarify this, describing how the OpenID Connect parties related to each other and to the equivalent parties in previous protocols, namely OAuth 2.0.

OAuth 2.0

The OAuth 2.0 authorization framework introduced a new set of characters into the distributed access control story.

oauth2-1

  • The User (aka Resource Owner) is a human with the capability to authorize access to a set of protected resources (e.g. the user is the resources owner).
  • The Resource Server is the HTTP server exposing access to the protected resources via an HTTP API. This access is dependent on the presence and validation of access tokens in the HTTP request.
  • The Client Application is the an HTTP client that accesses user resources on the Resource Server. To perform these accesses, the client application needs to obtain access tokens issued by the Authorization Server.
  • The Authorization Server is the party issuing the access tokens used by the Clients Application on the requests to the Resource Server.
  • Access Tokens are strings created by the Authorization Server and targeted to the Resource Server. They are opaque to the Client Application, which just obtains them from the Authorization Server and uses them on the Resource Server without any further processing.

To make things a little bit more concrete, leet’s look at an example

  • The User is Alice and the protected resources are her repositories at GitHub.
  • The Resource Server is GitHub’s API.
  • The Client Application is a third-party application, such as Huboard or Travis CI, that needs to access Alice’s repositories.
  • The Authorization Server is also GitHub, providing the OAuth 2.0 protocol “endpoints” for the client application to obtain the access tokens.

OAuth 2.0 models the Resource Server and the Authorisation Server as two distinct parties, however they can be run by the same organization (GitHub, in the previous example).

oauth2-2

An important characteristics to emphasise is that the access token does not directly provide any information about the User to the Client Application – it simply provides access to a set of protected resources. The fact that some of these protected resources may be used to provide information about the User’s identity is out of scope of OAuth 2.0.

Delegated Authentication and Identity Federation

However delegated authentication and identity federation protocols, such as the SAML protocols or the WS-Federation protocol, use a different terminology.

federation

  • The Relying Party (or Service Provider in the SAML protocol terminology) is typically a Web application that delegates user authentication into an external Identity Provider.
  • The Identity Provider is the entity authenticating the user and communicating her identity claims to the Relying Party.
  • The identity claims communication between these two parties is made via identity tokens, which are protected containers for identity claims
    • The Identity Provider creates the identity token.
    • The Relying Party consumes the identity token by validating it and using the contained identity claims.

Sometimes the same entity can play both roles. For instance, an Identity Provider can re-delegate the authentication process to another Identity Provider. For instance:

  • An Organisational Web application (e.g. order management) delegates the user authentication process to the Organisational Identity Provider.
  • However, this Organisational Identity Provider re-delegate user authentication into a Partner Identity Provider.
  • In this case, the Organisational Identity Provider is simultaneously
    • A Relying Party for the authentication made by the Partner Identity Provider.
    • An Identity Provider, providing identity claims to the Organisational Web Application.

federation-2

In these protocols, the main goal of the identity token is to provide identity information about the User to the Relying Party. Namely, the identity token is not aimed to provide access to a set of protected resources. This characteristic sharply contrasts with OAuth 2.0 access tokens.

OpenID Connect

The OpenID Connect protocol is “a simple identity layer on top of the OAuth 2.0 protocol”, providing both delegated authorisation as well as authentication delegation and identity federation. It unifies in a single protocol the functionalities that previously were provided by distinct protocols. As consequence, now there are multiple parties that play more than one role

  • The OpenID Provider (new term introduced by the OpenID Connect specification) is an Identity Provider and an Authorization Server, simultaneously issuing identity tokens and access tokens.
  • The Relying Party is also a Client Application. It receives both identity tokens and access tokens from the OpenID Provider. However, there is a significant different in how these tokens are used by this party
    • The identity tokens are consumed by the Relying Party/Client Application to obtain the user’s identity.
    • The access tokens are not directly consumed by the Relying Party. Instead they are attached to requests made to the Resource Server, without ever being opened at the Relying Party.

oidc

I hope this post shed some light into the dual nature of the parties in the OpenID Connect protocol.

Please, feel free to use the comments section to place any question.